Assign an organization, group, or individual to a lesson
-
Go to eLearning Product that provides hard and soft skills training, applicable for the entire employee life cycle (before, during, and after the hiring process), and includes training assessment and design tools.. Under Lesson Assignments, select Lessons.
The page refreshes to show the names of lessons and lesson blocks in the left pane’s Lessons list.
-
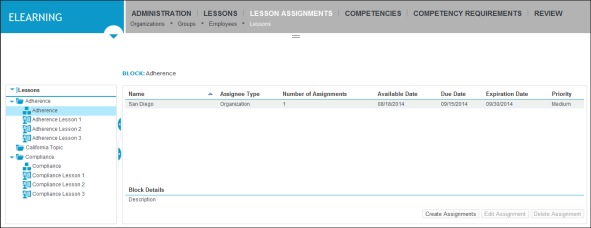
From the Lessons list, select the lesson or lesson block to which you plan to assign an organization, group, or person.
The right pane refreshes, showing the organization, group, or person that are already assigned to the lesson or lesson block.
-
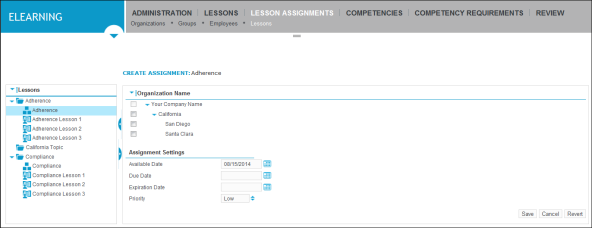
Click Create Assignments and, in the Create Assignments dialog box, click the Organization, Group, or Employee button.
The right pane refreshes, and the Create Assignment pane for the option that you selected (for example, the Organization option) opens.
-
On the Create Assignment form, do one of the following (based on whether you are assigning an organization, group, or person to a lesson):
-
If assigning an organization to a lesson, in the Organization Name area on the right pane, check the boxes beside the organizations or suborganizations that you want to assign to the lesson.
-
If assigning a group to a lesson, in the Group area on the right pane, select the boxes beside the groups that you want to assign to the lesson.
-
If assigning a person (employee) to a lesson, do the following:
-
To view a filtered list of people shown in the Employee area in the right pane or to create a new filter, click the arrow icon
 beside the View box at the upper right corner of the Create Assignment form. For information on filtering, see Filter information about organization members.
 -
In the Employee area, check the boxes beside the names of the individuals to whom you want to assign to a lesson
-
-
-
In the Assignment Settings area, do the following:
-
Type the date or click the calendar icon
 beside the Available Date box, and then select the month, day, and year that you want the lesson assignment to become available. The default date is the current date.
 -
Type the date or click the calendar icon
beside the Due Date box, and then select the month, day, and year by which the lesson assignment is due. The due date must follow the available date. There is no due date default. -
Type the date or click the calendar
beside the Expiration Date box, and then select the month, day, and year by which the lesson assignment expires. The expiration date must follow the due date. There is no expiration date default. -
Click the arrow icon
beside the Priority box, and then select one of the priority options, such as Medium.
-
-
Click Save.
The right pane refreshes again, showing the list of organizations, groups or individuals assigned to the lesson.